
Ruckus Upgrades - shown in order
radio and receiver
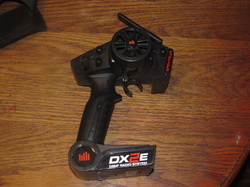 Spectrum DX2e Transmitter
I purchased the ECX Ruckus version 1 for $134.99 to get started in the hobby.
The first thing I noticed was the radio range was extremely short. I think I was
only getting about 40-50 ft before I would lose my signal. So, my first upgrade
was to a DX2e transmitter and receiver package ($79.99).
The first thing I noticed was the radio range was extremely short. I think I was
only getting about 40-50 ft before I would lose my signal. So, my first upgrade
was to a DX2e transmitter and receiver package ($79.99).
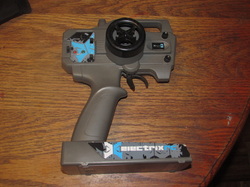 Original ECX stock transmitter
What was the benefit of upgrading to the Spectrum DX2e?
The original radio and receiver had crystal chips that determined what AM frequency the radio
and receiver “talked” to each other. This is a problem if you are running with someone else that is on the same frequency or if you get any kind of interference on that frequency. If you have multiple vehicles running on the same frequency, the radios will transmit (“talk”) to both receivers. So, when you tell your car to go, both cars will go, turn, etc. The old system required
you to change the crystal in the radio and the receiver to avoid cross “talk”.With the Spectrum system, the radio and receiver use a different radio bandwidth (2.4Ghz) and use multiple frequencies at the same time along with encoding to prevent this cross “talk”. I’m not going to try and explain the entire theory on how this works. What’s important is, you no longer have to worry about changing crystals. Once you bind the radio to the receiver, you don’t have to worry about it anymore. The other benefit is the range. I don’t know the exact distance, but it’s far enough that you can hardly tell anything about the vehicle once it’s getting out of range!
NOTE: Shortly after I purchased the Ruckus and the Spectrum Radio, ECX started including the DX2e radio and receiver with the stock truck. They may have even offered upgrades to existing customers. I’m not real sure about that because I had already purchased the upgraded radio and receiver.
Motor, esc upgraded to brushless
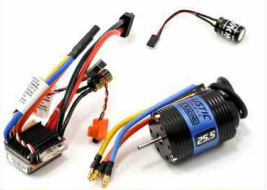 Novak Edge, Ballistic 25.5T combo, NOV3339
The next upgrade I made was a brushless motor ($99.99). I wanted to go faster and I wanted longer run times. Out of the box, the Ruckus ran for about 13-15min stock.
a. The cheapest esc/motor combo I could find at my local hobby shop was a Novak Edge/Ballistic 25.5T.
b. The first thing I noticed was that my speed didn’t change. If anything it was a little slower, but I had incredible battery life. I went from about 15min to about 30min.
c. I didn’t know much about brushless at the time. I learned about the different turn ratios, speed, motor temps, etc. through trial and error.
replacement stator for the 25.5t motor

I did not get the speeds I was looking for out of the new motor because I did not educate myself beforehand. Luckily, the Novak Ballistic has interchangeable stators for the motor. I ordered a 17.5T stator ($39.99) runtimes were about 20-25min and was able to get decent speeds, but still not quite where I wanted. So, I order the 10.5T stator ($39.99). This was a low as I could go with the Edge esc, but at least I was satisfied with the speeds (35-37mph). However, my runtimes were back down to where I was when the truck was stock 13 – 15min.
driveshafts
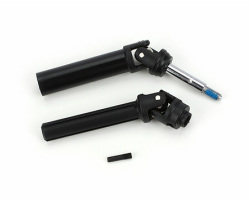
After the 10.5T stator/motor was running and I got a handle on the speeds, I learned that the ECX drive shafts would not hold up to the torque. So, my next upgrade was to the Traxxas Heavy Duty drive shafts (TRA6852X - $9.25). They were better. I broke them too, but not quite as often.
a. The Traxxas drive shafts have flats inside of the hub that attaches to the transmission output shaft. In order to get them to work on the Ruckus, I had to run a drill bit through the hub making it round like the ECX hubs.
a. The Traxxas drive shafts have flats inside of the hub that attaches to the transmission output shaft. In order to get them to work on the Ruckus, I had to run a drill bit through the hub making it round like the ECX hubs.
adjustable camber links and shock oil
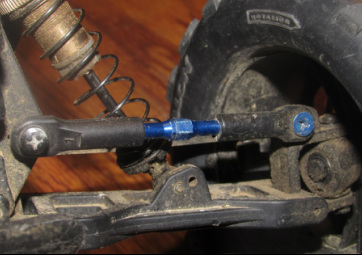
With the speeds I was now reaching, I realized that the handling of the truck was a big factor. I could hardly turn it without it flipping. Unfortunately, the stock set up for camber was fixed and could not be adjusted. My next upgrade was Traxxas adjustable turn buckles (TRA3741A -$19.99). I was able to use the selection in the package for the front and back camber links on the Ruckus. I also purchased thicker shock oil (Losi 60# -$6.49). I was now able to get the handling I needed for the speeds I was running.
steering/servo saver trick
 Wire tie on stock servo saver.
Another upgrade that should be mentioned, but I have not included it before now because it's free and not really an upgrade as much as it is a mod or trick, is the wire tie on the stock servo saver. If you are not familiar, there are a couple if problems with the steering on the stock Ruckus.
i. The stock servo is slow.
ii. The servo saver is weak and generates A LOT of slop in the steering.
The wire tie is not really an upgrade as much as it is a mod/trick.
The stock servo saver has a plastic “C” shaped ring that the opens up when too much force is applied to the steering linkage in order to protect the servo; however, it generates so much slop that I’d rather break the servo instead of dealing with it. The trick is to wrap a wire tie tightly around the plastic “C” part to prevent it from opening. This reduces a good deal of the play/slop. It also has the potential to destroy your servo, so beware! I have been running the Ruckus like this for about 1-1/2 years and have not broken the servo YET.
Here’s the list to upgrades for aesthetic purposes (to make it look good):
1) The first purchase was decals for the existing body ($5.99)
2) Next was a new green body and more decals ($49.99, $5.99, $7.99, $4.99)
3) Axial light bucket kit ($25.99)
4) Turnigy LED light strips (Amber $7.99, Blue $7.99, White $7.99)
5) ProLine roof rack ($14.99)
6) ProLine accessory kit ($17.99)
7) Anaconda Wheels and Tires ($39.99, $35.99)
8) Traxxas Stampede Wheels and Tires ($27.99, $28.99)
9) LED’s and Resistors from Radio Shack ($1.49, $4.29, $1.49, $2.99)
10) Hot Glue Sticks ($2.49)
11) Miscellaneous items that I could find (Free)
Total investment about $734.28
